Swift for Xojo Developers : Part 15 - a Drop in Single Column Table manager

This is a “simple” listbox, simple in the fact that is is only one column. but it is 100% contained in a single class, and customizable. It does NOT have multiple sections, but it does have a header (with colors, fonts etc). It supports the standard CellTypes (default, subtitle,value1 and value2)

as of right now (27Mar2023) the code is almost 400 lines (so I won’t post it all here).
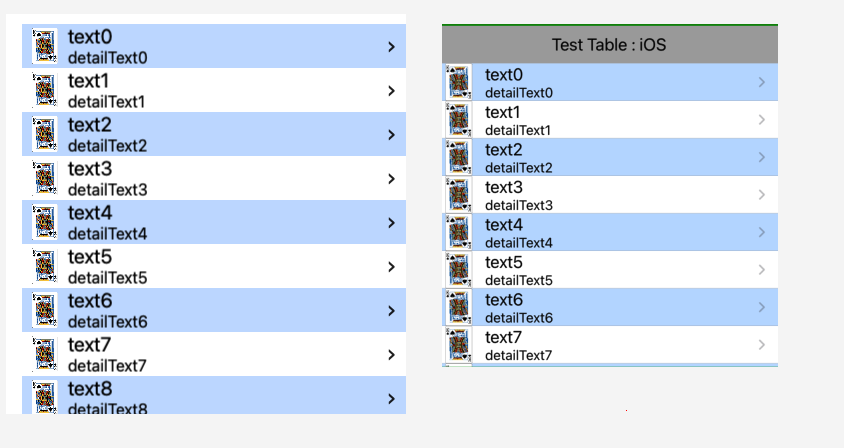
It is designed to work with iOS, macOS and tvOS programs from this single code base
NOTE : only iOS has been tested… The others will be over the next few days, and may involve a few changes.

the basic functions and properties are as follows :


//
// Use typeAlias to switch object classes based on platform
//
#if os(macOS)
typealias t1c_tableView           = NSTableView
typealias t1c_tableViewCell       = NSTableViewCell
typealias t1c_font                = NSFont
typealias t1c_color               = NSColor
typealias t1c_image               = NSImage
typealias t1c_tableViewDelegate   = NSTableViewDelegate
typealias t1c_tableViewDataSource = NSTableViewDataSource
typealias t1c_View                = NSView
typealias t1c_Label               = NSTextField 
#else // iOS and tvOS
typealias t1c_tableView           = UITableView
typealias t1c_tableViewCell       = UITableViewCell
typealias t1c_font                = UIFont
typealias t1c_color               = UIColor
typealias t1c_image               = UIImage
typealias t1c_tableViewDelegate   = UITableViewDelegate
typealias t1c_tableViewDataSource = UITableViewDataSource
typealias t1c_View                = UIView
typealias t1c_Label               = UILabel
#endif

protocol t1c_Protocol : NSObjectProtocol {
    func t1c_Clicked(row:Int)
    func t1c_DoubleClicked(row:Int)
}

//
// Generic Row Structure
//
public struct t1c_CellData {
    var text       : String?
    var detailText : String?
    var accessory  : t1c_tableViewCell.AccessoryType = .none
    var image      : t1c_image?                      = nil
    var rowTag     : Int?                            = nil
}
//
// Main Object Class
//
class oneColumnTable :  t1c_tableView, t1c_tableViewDelegate,t1c_tableViewDataSource {
  
    convenience init(frame: CGRect, cellStyle: t1c_tableViewCell.CellStyle = .default) { // must specify style at creation. -initWithFrame: calls this with StylePlain
    //
    // Heading Functions
    //
    public final var hasHeading : Bool {
    public final var heading : String { 
    public final var headingFont : t1c_font { 
    public final var headingHeight : CGFloat { 
    public final var headingColor : t1c_color { 
    public final var headingBackColor : t1c_color {
    //
    // Alternating Row Background Colors
    //
    public final var oddRowColor : t1c_color {
    public final var evenRowColor : t1c_color {
    //
    // Main Text Attributes
    //
    public final func text(row:Int,text:String?) {
    public final func text(row:Int) -> String? {
 
    public final var textColor : t1c_color {
    public final var textFont : t1c_font {
    //
    // Detail Text Attributes
    //
    public final func detailText(row:Int,subText:String?) {
    public final func detailText(row:Int) -> String? {
    
    public final var detailTextColor : t1c_color {
    public final var detailTextFont : t1c_font {
    //
    // Row Image (is ignored if cellType is value2)
    //
    public final func image(row:Int,image:t1c_image?) 
    public final func image(row:Int) -> t1c_image? {
    //
    // Row Tag
    //
    public final func rowTag(row:Int,rowTag:Int?) {
    public final func rowTag(row:Int) -> Int? {
    //
    // Row Accessory
    //
    public final func rowAccessory(row:Int,accessory:t1c_tableViewCell.AccessoryType = .none) {
    public final func rowAccessory(row:Int) -> t1c_tableViewCell.AccessoryType {
    //
    //
    // Operational Functions
    //
    public final func removeAllRows() {
    public final func removeRow(row:Int) {
    public final func addRow(text:String) {
    public final func addRow(cellData:t1c_CellData) {
    public final func insertRow(row:Int,text:String) {
    public final func insertRow(row:Int,cellData:t1c_CellData) {
    public final var listCount : Int {  
    public final var listIndex : Int {
    public final var setRowHeight : CGFloat {
}

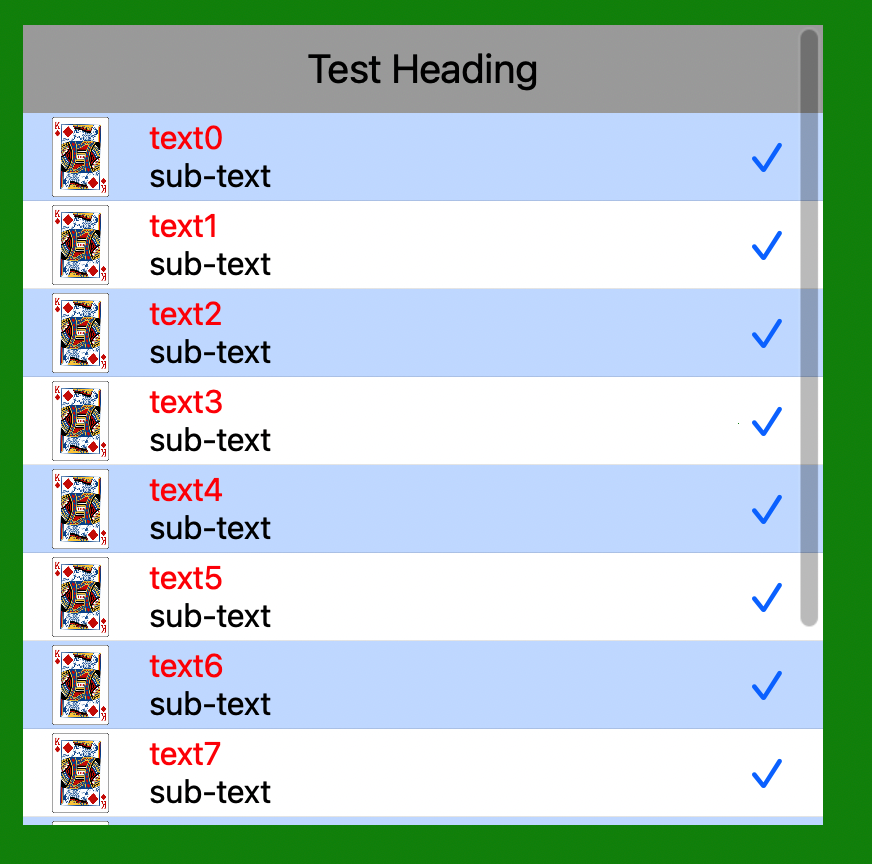
EXAMPLE OF USE this produced the above table

        let xyz = oneColumnTable(frame:ghost.frame,cellStyle : .subtitle)
        the$View.addSubview(xyz)
        xyz.clickDelegate = self
        for i in(0...10) {
            xyz.addRow(text:"text\(i)")
            xyz.detailText(row:i,subText: "sub-text")
            xyz.rowAccessory(row: i,accessory: .checkmark)
            xyz.image(row:i,image: UIImage(named:"pref_FACE"))
        }
        xyz.listIndex = 4
        xyz.textColor   = .red
        xyz.hasHeading = true
        xyz.heading = "Test Heading"
1 Like

Thank you for sharing this.

I have the iOS code working, turns out the macOS code is more complex (ie. older) so it is not only taking a bit longer, but it is much more code required. But in the end it will be just one file to add to your project regardless of what platform(s) it supports

Well this is frustrating. I have a macOS version of the code working except for HEADER
I cannot for the life of me find examples of how to do a proper header… I may resort to faking it with a NSView over the scroller… :frowning:

but here is what is produces so far. The left is macOS, the right is iOS (screenshots are slighly different due to simulator (I’m guessing))

Well getting closer… unbelievable how much more code it takes for macOS to do what iOS can do.
This label looks/works just like the iOS version of this function, but it required adding an NSLabel (oh yeah, macOS doesn’t HAVE an NSLabel, so the code includes a class for that too)

2 Likes

Seems to be working as designed now. Table created for macOS uses same formats as does iOS

here is an an example of use

   let frame = CGRect(x:20.0,y:20.0,width:400,height:400)
        let myLIST = oneColumnTable(frame:frame,cellStyle: .default)
        //let myLIST = oneColumnTable(frame:frame,cellStyle: .subtitle)
        //let myLIST = oneColumnTable(frame:frame,cellStyle: .value1)
        //let myLIST = oneColumnTable(frame:frame,cellStyle: .value2)
        myLIST.clickDelegate = self // for click and doubleClick actions

        for i in(0...3) {
            switch i {
                case 0:
                    myLIST.addRow(text:"Text Label")
                    myLIST.detailText(row:i,text: "Detail Text Label")
                    myLIST.rowAccessory(row: i,accessory: .checkmark)
                case 1:
                    myLIST.addRow(text:"Dahlia")
                    myLIST.detailText(row:i,text: "This is dahlia")
                    myLIST.rowAccessory(row: i,accessory: .disclosureIndicator)
                    myLIST.cellStyle(row: i,style:.value1)
                case 2:
                    myLIST.addRow(text:"Daisies")
                    myLIST.detailText(row:i,text: "These are daisies")
                    myLIST.rowAccessory(row: i,accessory: .detailButton)
                    myLIST.cellStyle(row: i,style:.value2)
                case 3:
                    myLIST.addRow(text:"Text Label")
                    myLIST.detailText(row:i,text: "Detail Text Label")
                    myLIST.rowAccessory(row: i,accessory: .detailDisclosureButton)
                    myLIST.cellStyle(row: i,style:.subtitle)
                default : break
            }
            myLIST.image(row:i,image: NSImage(named:"deck01_KS"))
        }
        myLIST.setRowHeight   = 44
        /*
         myLIST.selectBackground = .green
         myLIST.selectForeground = .blue
         myLIST.textColor        = .blue
         myLIST.detailTextColor  = .magenta
         */
        myLIST.listIndex        = 2

        myLIST.hasHeading     = true
        myLIST.heading        = "Test Table : macOS"
        myLIST.headingHeight  = 44
        //myLIST.headingColor = .red
        //myLIST.headingBackColor = .orange


        self.contentView!.addSubview(myLIST) // add to macOS Window
      //self.view.addSubview(myLIST) // add to iOS view

if interested in a copy of the Swift code, drop me a PM with your email address (Donations ARE accepted :slight_smile: )

1 Like