Onwards & upwards we go.
As mentioned we’re NOT going to do much more than use a giant string for TextInputCanvas.
While not an optimal choice it works well enough to demonstrate the TextInputCanvas.
So we’ll add a protected property
mTextBuffer as string
and that will suffice for the text backing buffer.
Lets move on to one of the simpler events - InsertText.
Event InsertText(text as string, range as TextRange)
End Event
When our subclass has focus every typing keystroke (not cursor movement or editing ones) will generate an insert text event and pass the text to be inserted, This is usually a single keystroke but CAN be more than one character so make no assumptions about the length of the text to be inserted.
Many times the RANGE parameter will be nil. This will be the case if there is no selected text that is to be replaced with the text being typed.
Currently, because we dont support selections yet, this parameter can be left unconsidered.
Insert Text can be really simple for now - just append the character typed to our internal buffer.
And trigger an invalidate so we redraw.
Now things start to show & get more complicated.
We dont have a text font, text size, color and all those necessary properties.
To emulate something like the code editor it has even more choices with different choices for different types of values, keywords, etc and so it also needs code to identify all those things.
We’re not going to implement all those things but be aware that to implement something like the IDE code editor there is more work required.
For now lets add Text related properties and expose them in the Property Inspector
 Public Property Underline as boolean
 Public Property Bold as Boolean
 Public Property Italic as Boolean
 Public Property TextColor as Color = &c000000
 Public Property TextFont as string
 Public Property TextSize as double
 Public Property TextUnit as Integer = 0
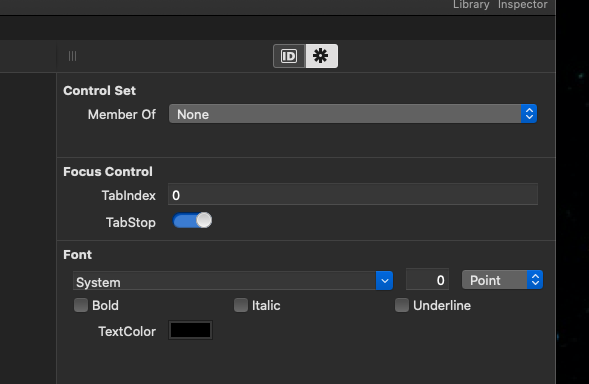
Add them to the Inspector Behaviour so they can be set in the IDE’s inspector
Also add a new Font group to the inspector behaviour and place all these text properties in that group.
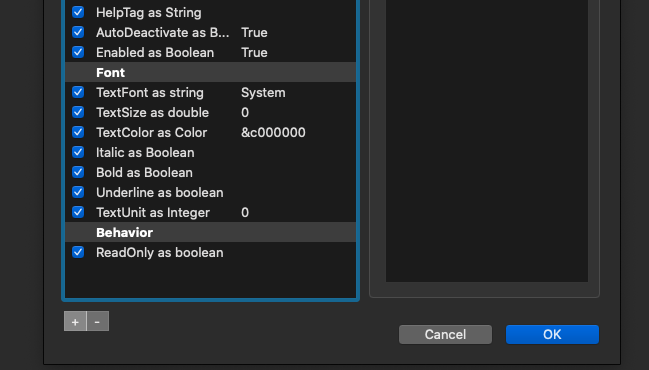
Adding these properties and exposing them in the inspector behaviour this way will give you that nice font selector in the IDE inspector.
Now we have all the required information to start drawing the text.
Note we’re not handling scrolling - yet
Drawing text is pretty simple
Once its split into line we start at “the first text baseline” and then draw each line one “line height” further down from the previous one.
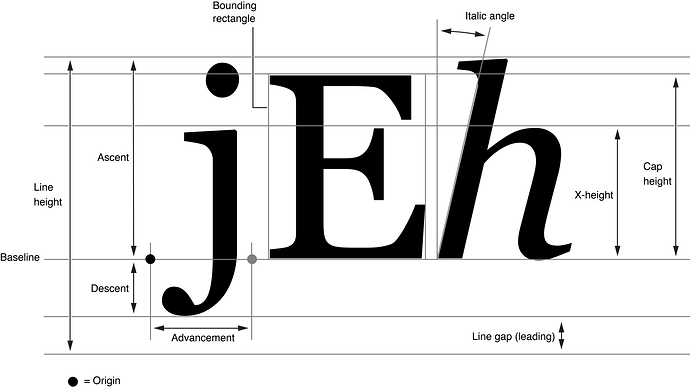
In Xojo the FIRST baseline would be the height of the ASCENDER
Then the height between lines would be the g.TextHeight
So for now our simple draing can be as sphisticated as
g.forecolor = &cFF000000
g.FillRect 0, 0, g.Height, g.width

// our text buffer MAY have ultiple lines in it so lets
// do the blindingly lazy and ReplaceLineEndings
// and split on line endsins and just draw

Dim lines() As String = Split( ReplaceLineEndings(mTextBuffer, EndOfLine), EndOfLine )

g.ClearRect 0, 0, g.Height, g.width

// ok now ... draw away !

g.ForeColor = Self.TextColor
g.TextFont = Self.TextFont
g.TextUnit = CType(Self.TextUnit, REALbasic.FontUnits)
g.TextSize = Self.TextSize
g.Underline = Self.Underline
g.Bold = Self.Bold
g.Italic = Self.Italic

Dim drawAtX As Double
Dim drawAtY As Double

drawAtY = g.TextAscent
For i As Integer = 0 To lines.ubound

  g.DrawString lines(i), drawAtX, drawAtY

  drawAtY = drawAtY + g.TextHeight
Next
Now if you click on the text editor and give it focus and type you should be able to see your tying starting to appear.
But pressing Return and Enter do not do anything - yet.
Those are handled entire differently as part of DoCommand which handles a LOT of the text input commands for cursor movement, selection, and numerous other items.
